Gece33/Getty Images
By Hiba Fiaz/
In an era dominated by technological breakthroughs, the iPad stands as a quintessential device, offering functionality and performance that stands unrivaled among other devices in the field. It’s not just about the sleek design and powerful hardware — your iPad’s settings offer you a realm of possibilities and give you the power to make it work exactly how you want it to. A tool is only as powerful as the hand that wields it, and you can make the iPad’s true potential come to life once you’ve nailed down the settings you need to customize.
Fortunately, there’s not a lot of technical jargon associated with tailoring your iPad’s settings. The key is to make strategic adjustments according to your personal needs to maximize performance. A few simple taps on the screen can change its fundamental configurations, disable annoying features, and increase overall efficiency — all to ensure you don’t ruin your iPad experience.
Keyboard settings

Justin Sullivan/Getty Images
Typing on your phone and typing on an iPad are entirely different experiences, mainly because of the significant size difference. If you’re a regular iPad user, you’re probably part of a woeful community of people familiar with strains in their fingers due to using their thumbs to type on the iPad’s massive keyboard for long periods of time.
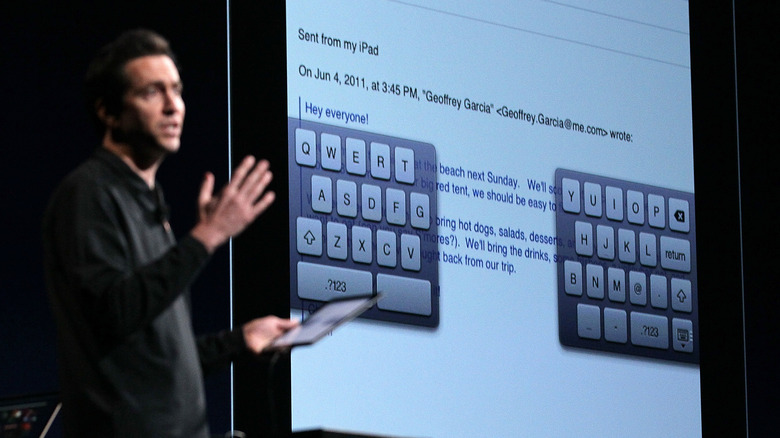
This is where the iPad’s split keyboard comes in handy. Once you enable the toggle for Split Keyboard, the keyboard has the ability to bifurcate into two smaller sections on either side of your screen. Now, you can easily type for extended periods of time regardless of how you’re holding your iPad without constantly stretching out your thumbs to reach the letters in the middle of the keyboard.
Another quick change you can make in your keyboard configurations is to opt for the miniature floating keyboard. This floating keyboard takes up less screen space and can be dragged anywhere across the screen to be used at convenience. Needless to say, these couple of tweaks with your iPad’s keyboard are simple yet highly effective at enhancing user experience, and this is one of the features that not every iPad owner knows about.
Ask to Join Networks

Joe Raedle/Getty Images
Nothing is more irritating than dismissing unwanted notifications on your iPad. It disrupts your workflow and leeches off your already-scarce patience. One such feature that falls in this category is the iPad’s ability to continuously seek out available Wi-Fi networks and attempt to join any new ones in range. While the thought process behind this feature is well-intentioned, the repeated pop-ups asking you permission to join can get quite disruptive, especially if you’re in a public space or on the move.
Luckily, disabling this feature takes less than a minute, and you can navigate to your iPad’s settings and disable the Ask to Join Networks option. This will eliminate the stream of notifications hindering your productivity while also giving you more autonomy over your iPad’s connectivity. Whether you’re sitting with your iPad at a new coffee shop to get some work done or studying on your way to your destination, you can now do so without any interruptions.
Forgetting to use the Multitasking menu
The iPad excels at performing complex tasks like extensive research, content creation, data analysis, and more, but switching back and forth between multiple apps to do so takes a lot of time and energy. It’s like juggling with one hand tied behind your back. You want your iPad to keep up with your pace, not hold you back when you’re knee-deep in getting things done.
The iPad has a plethora of existing settings and features that allow you to perform these challenging activities with efficiency and speed, and the Multitasking menu is the jewel in the treasure trove. Multitasking allows you to work with more than one app at a time without having to go through any hassle at all. You can use its Split View to enable apps to appear side by side or opt for the Slide Over option, where an app appears as a small floating screen.
Users sometimes tend to overlook the little icon with three horizontal lines at the top of their apps that lets them use Multitasking, or they just don’t have the icon because the setting Allow Multiple Apps under Multitasking in the Settings app is disabled. Turn the toggle green for that option right now, and keep a look out for the little dotted icon on your apps. The setting is so accessible and user-friendly that one could say it’s a crime to stick to the default solitary screen. It still can’t replace your laptop, but it’s pretty close.
Auto-Lock settings

kasarp studio/Shutterstock
Okay, picture this scenario: you’re working on your iPad, deeply engrossed in performing a certain task, or winding down and watching some videos, and your iPad decides to take a nap right in the midst of things because of a bit of inactivity. Pretty frustrating, isn’t it? Well, imagine if you could change your iPad’s settings so it stays awake as long as you need it. That’s exactly what happens when you change Auto-Lock settings to Never on your iPad.
It’s sort of like a personalized sleep timer for your device. You can find Auto-Lock under Display & Brightness in the Settings app and change it quickly with a few taps at any given time. Doing so will ensure uninterrupted usage and offer convenience. Altering this setting will also make it easier for users with motor impairments or disabilities since they won’t have to unlock their iPads too frequently.
Whether you’re following a recipe in the kitchen, giving an important presentation, reading a book, or watching a movie wrapped up in your blanket on a cold winter night, you can now make the most out of your iPad without worrying about your screen dozing off every few minutes.
Never enabling Focus Mode
Focus is one of Apple’s most popular features since its release in 2021, and you might not realize how much you need it until you actually use it. It completely changes your iPad experience and the way you perform tasks, and you can’t help but wonder how you once managed without it. If you don’t have it enabled, you’re selling your iPad experience short.
Turning on Focus lets you do exactly what the name says: find your focus when using your iPad. It does this by completely muting all your notifications or only allowing specific notifications to come through. Your iPad experience instantly goes from chaotic to controlled. It’s like wearing a pair of noise-canceling headphones so the world fades into the background, except it’s suppressing your notifications instead of loud noise. Focus mode can be enabled from the Control Center or through the Settings app. More so, you can even schedule it so it automatically turns on at various times during the day.
When you open Focus in Settings, you will see there are several preset modes you can activate like Driving and Sleep. Want something else? You can even go ahead and create your own Custom Focus. Whatever you choose, you can edit to select the people you want to receive notifications from when the feature is enabled. The more you use it, the better it gets as your iPad will use on-device intelligence to refine notification management based on usage patterns it identifies. If you’re looking for features to transform the way you use your iPad, this should definitely be on your list.
Keeping Camera grid turned off

Travellingdede/Shutterstock
Whether you’re a skilled photographer or not, everyone loves capturing perfect little moments, gorgeous landscapes, and drool-worthy meals. Good pictures hold the power to evoke the strongest emotions and preserve your memories forever. With an iPad in your hand sporting a powerful camera that Apple is so well-renowned for, taking good photos is more accessible than ever.
But there’s a certain setting on your iPad that’s disabled by default. It’s seriously hindering your iPad photography game even further, and it’s called the Grid. By overlaying a grid on your camera, you can perfectly align your photos. It follows a common principle in photography called the rule of thirds, where the camera screen is divided into nine squares using two horizontal and two vertical lines. The focal interest of your photo is then placed on these grid lines or their intersections. This helps you capture a photo that is perfectly symmetrical with a balanced composition.
Ultimately, these grid lines serve as amazing visual guides for amateurs as well as professionals. An influencer, a student, a traveler, an artist, a photographer; no matter who or what you are, you’re not doing yourself any favors by keeping this setting toggled off on your iPad.
Not using Quick Notes
We’ve all been in a situation where we find ourselves in a frantic scramble for pen and paper/ to jot down a fleeting thought, note, or number. With Quick Notes on iPad, you can leave this particular problem in the past. Quick Notes is a digital notepad that is effortlessly accessible no matter what you’re doing on your iPad, offering an ideal modern solution to an age-old problem.
If you’re browsing through different websites or using various apps, you do not have to close them and open the Notes app separately to write something down. Instead, you can use a hidden iPad screen gesture to quickly access Quick Notes. If you toggle on Swipe Finger from Corner under Multitasking & Gestures settings, Quick Notes appears over any app or screen on your iPad when you swipe up from the bottom right corner of your screen using your finger or Apple Pencil. But that’s not all –- Quick Notes is incredibly versatile, and you can do much more than just typing out some notes.
You can also use the Markup tool to sketch something, paste Safari URLs and hyperlinks, insert screenshots and photos, add mentions and tags, and create important to-do lists on the go. All of the Quick Notes you make can be found in the Notes app under the Quick Notes folder. If you’ve used the Add Link button to insert a link in a Quick Note, the Quick Note will also show up as a thumbnail when you’re browsing that website. If you’re not sold yet, here’s the best part about this feature — if you own another Apple device like a Mac or an iPhone, these Quick Notes are automatically synced across all your other devices.
Working without lines and grids in Notes

sergey causelove/Shutterstock
While we’re talking about Notes, we’ll tackle another important setting you should change to ensure you’re not compromising on your iPad experience. This one will help you (quite literally) keep your thoughts in line. If you’re scratching your head over the subtle subtext in the last line, it’s referring to the Lines & Grids feature that you can enable in the Notes app to make sure that the once pristine note you started writing on doesn’t end up resembling the aftermath of a chaotic battlefield. It’s one of those iPad features that changes how you use your tablets.
There are quite a few different options present, ranging from small to large, with single, double, and triple line spacing when you go to Lines & Grids under Notes in your settings. You can select your preferred grid style and it will show up every time you create a new note. The great thing about adding lines to your Notes app is the fact that you’re provided with a familiar writing surface that is very similar to the traditional notepad. This is extremely useful for students trying to take handwritten notes, people wanting to make symmetrical diagrams and sketches, and anyone who aims for a neat and organized layout.
App Tracking
You know what really throws you off when you’re trying to do something? Someone constantly peering over your shoulder or leaning in to glance at what you’re doing -– except it’s not just someone in this case, it’s many of your iPad apps, which silently track what you’re up to while collecting data. You’re better off if you disable Allow Apps to Request to Track under Tracking in your iPad’s settings, and keeping it toggled on is one of the common mistakes users make when using their iPad. Once you turn this toggle gray, all app tracking requests are refused and you won’t have to manually do it yourself every time.
When Apple first released App Tracking Transparency back in 2021, it took the tech world by storm. Apps were not allowed to track you without explicitly taking permission beforehand. This sparked intense pushback from companies that relied on targeted advertisements for business, and a debate ensued. Fortunately, Apple stood firm on its decision to protect user privacy and give more autonomy to the users. This caused a massive shift in the norms and dynamics of the tech industry, as users were now more educated, empowered, and informed about app tracking.
Your location, browsing history, and usage patterns are just some of the major things that apps on your iPad have access to. It’s important to take control over your privacy by going to settings and toggling off Allow Apps to Request to Track. With app tracking continually working behind the curtains, your privacy is not the only thing taking a hit — your battery begins to drain faster, too.
Opting not to enable Live Text
Imagine you miss a day of school or work, and a friend sends a picture of all the notes they took so you can copy them down into yours. Normally, you’d have to type them into your own document and it would take hours on end. But with Live Text, you can say goodbye to endless scrolling and manually copying down text from a photo or video. Your iPad does all the heavy lifting for you, saving you the pain of wasting your time on a fruitless task. You can easily enable Live Text by going to Language & Region under General in the Settings app, where you will find a toggle to turn on or off at your convenience.
Your photos and videos become a playground of editable text, and you can engage with them in multiple different ways. Live Text doesn’t just limit you to copying, selecting, and pasting text, but also allows you to look up the text on various websites and share it with your contacts. You can even translate the text in an image or video presuming Live Text is enabled for the certain language.
To take it an even bigger step further, you can use Live Text with the Camera app on your iPad as well. Just point your camera at the text and the Live Text icon will appear in your frame. Live Text on iPad is here to make your life easier, one word at a time.